Update: Want to see more chalk art? Click here to see my weekly baby bump chalkboards! :)
I've had several questions about how I made the chalkboard art I used in our
pregnancy announcement pictures. It was actually pretty easy...a little time consuming, but I thought it was worth it. And I promise,
anyone can do this. I absolutely cannot do anything artsy by hand, so I
have to have something to trace. Doing it this way, I was able to turn some of my favorite fonts into cute chalkboard art. I used
this website for the chalk art idea. {Have you seen her baby bump chalkboards?! Oh my goodness, the cuteness!} And I used
this basic tutorial for how to get the art I made on the computer transferred to the chalkboard.
There might be a MUCH easier way out there to do this, but here's how I made the art on the computer:
*Also, if you want to know the fonts I used, I listed them at the bottom of this post. :)
1. Open a new presentation in Power Point. Change the slide size by clicking the Design tab at the top and then Slide Size on the far right. Choose Custom Slide Size. My chalkboard {minus the frame} is about 20" x 27" so that's what I entered.
 |
| {Click the picture to enlarge.} |
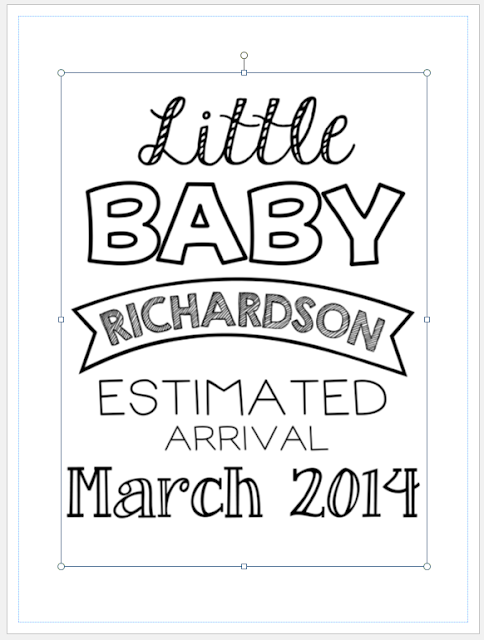
2. I created my art using one text box at a time. I like using Power Point for this kind of thing because it lets you layer text boxes on top of each other much easier than Word or Publisher. {And I don't have Photoshop or Illustrator.} First I did a text box for "Little."
Then I made a text box for "Baby" and continued this for each line.
3. When your art is complete, you'll need to save it as a picture file. Go to File, then Save As. Choose the folder where you want to save it. When the Save As window comes up, name your file, and click on the drop down menu on the right side of the "Save as type:" section.
 |
| {Click the picture to enlarge.} |
4. I don't really know much at all about picture formats, but I usually choose JPEG or PNG because they seem to be the easiest to work with. Choose a format and then click Save.
 |
| {Click the picture to enlarge.} |
5. Open Publisher and click on More Blank Page Sizes.
 |
| {Click the picture to enlarge.} |
6. Click Create New Page Size and enter the same dimensions as you did in Power Point, adding one inch to both the height and width to account for the margins in Publisher. In Power Point my dimensions were 20" x 27" and in Publisher they were 21" x 28".
 |
| {Click the picture to enlarge.} |
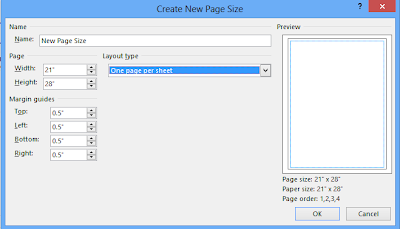 |
| {Click the picture to enlarge.} |
7. Click Create.
8. Click on Insert and then Picture. Find where you saved your picture file from Power Point and click Insert.
9. You'll need to resize your picture to cover the whole page - from blue line to blue line. Here's what mine looked like right after I clicked Insert.
 |
| See how the picture is smaller than the blue lines that go around the page? |
This is how it should look after you resize the picture.
 |
| See how the picture now lines up with the blue lines around the page? That's what you want. |
10. Click File and then Print and you should see a preview that looks something like this.
Once you print it out, this is what you'll have.
11. From here, carefully trim off the edges of white space so that all of the letters will line up correctly. Tape the pages together. I taped the top three pages together, then the middle three, and then the bottom three. I did not tape all three rows together. It's like I have three banners. I thought it would be much easier for transferring the art to the chalkboard and it definitely was.
Once I reached this point, I followed
this tutorial exactly except I just traced one banner at a time {step by step photos below}. That way my wrist didn't mess up the middle part while I was detailing the top part.
I started by positioning my banner on the chalkboard to try and get it as centered and straight as possible.
I lightly marked the corners of the position of the top banner on the chalkboard and then colored the back of the banner with colored chalk.
Then I carefully taped the banner in place on the chalkboard and traced over the letters. I used three different tools for this: the end of a Sharpie, the tip of a mechanical pencil, and the tip of a pen. For thicker letters, I used the end of a Sharpie and for skinnier letters I used the tip of the pencil or pen.
I traced the letters, removed the banner, and then went over it again with the chalk. Don't worry about chalk dust or smears. You can fix those later.
I used a pencil sharpener to keep the tip of my chalk sharp. This helped A LOT!!
I repeated the steps above for each banner.
Here's what the chalkboard looked like after I finished all the tracing and retracing.
Remember how I said not to worry about chalk dust and smears? Here's where you're going to fix that. Just get a little bowl of water, Q-tips, and paper towels and touch up any areas that need it. See? Easy!! :)
All done! LOVE! I see lots of chalkboard art in my future! :)
I'd love to see any chalk art you've created! Leave a comment below with a link! Also, feel free to let me know if you have any questions at all! :)
Have a fabulous day, y'all!!


.jpg)


